Create Animated GIF Banner / Image using Photoshop.
Many people are using Adobe Flash Maker or some what other software related to flash for creating Animated Images (GIF) or for creating Advertisement Banners. In this post i'll show you how to create Animated GIF Banner / Image using Photoshop. In some easy steps.
 |
| This the demo of this tutorials |
Step 1 : Open Photoshop, create new page with required height and width. Mostly for advertise banner 125x125 or 300x250 are used you can adjust Height and width on your need. I'm using 500x275 as shown in image below :
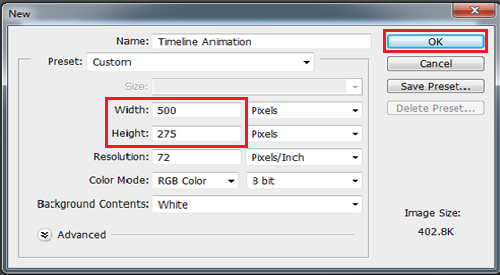 |
| Create a page of 500x275 pixels |
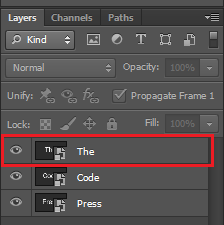
Step 2 : I had created 3 layers for showing you an example, you can use as many layers you want.
 |
| Layer : 1 |
 |
| Layer : 2 |
 |
| Layer : 3 |
Step 3 : Go to Windows -> Click on Time line or if their is Animation then click on it. I have Time line option.
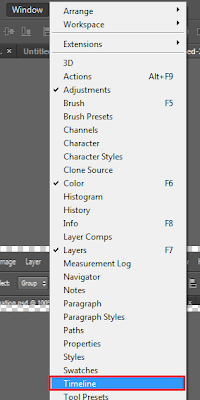 |
| Click on it. |
Now at down you will see some group of Tabs are opened, don't close it or you will need to open it again by following Step 3.
Step 4 : Now see in the below images, i had marked a "YELLOW BOX" on an arrow. click on it.
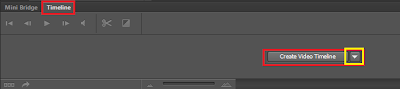 |
| Click the arrow button which is hi-lighted by Yellow Box. |
After click on that arrow you will see a drop down menu pop-up, Click on "Create Frame Animation" as shown in below image :
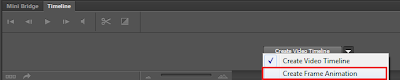 |
| Click on Create Frame Animation. |
Step 5 : Now you will see the button which text was "Create Video Timeline" changed to "Create Frame Animation". Then click on the button. By default it will take top layer as First Frame.
 |
| I have highlighted which layer will come first. |
OK, so now to got your Animation Frames Time line which is like this :
 |
| Click the area which i had highlighted . |
Now click the area which i had highlighted, after that you will see a timeline will appear, see the image below.
OK, so now if you will click on "PLAY" button your layers will play like a video.
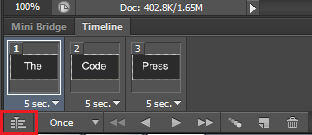
Step 6 : Now you are done with your animation, but before saving we will change the frame timing. Now you will need to go back to the Animation frame Timeline. see the image below.
I had highlighted two areas with box one is "RED BOX" and another is "YELLOW BOX" to play you animation you will need to click the play button which i had highlighted with "RED BOX", and now to move on "Animation Frame Timeline" you will need to click the area / button which i had highlighted with "YELLOW BOX".
Step 7 : Now we are going to change the time / speed of Frame. After moving on Animation Frame timeline if you will play your Animation, It will run slow or might be fast. See the below image i have shown that where to click to change speed / time of frame.
If you want to play the animation then see the are which i had highlighted with "YELLOW BOX" click on it you animation will play. See the area which i had marked with "RED BOX" click on it you will see a drop down menu will appear like this :
After clicking on "5 sec." a drop down menu appears, you can adjust the speed by clicking the "1.0","2.0","Other" i'll click on 1.0 it means, i don't want my animation's frame to move on every 5 seconds that's why i'm changing the time form 5 sec to 1 sec. we will need to do it on every frame or you can add different time / speed on every frame by doing the same procedure.
Step 8 : Now we have to make our animation to run again and again (Repeat) like on advertisements. See the image below to know where to click.
After clicking on "Once" button you will see a drop down menu will appear, when you load a Animation frame timeline by default the frame speed / time is selected to 5 sec in the same way it's also selected to "ONCE" so if you want to make it to run again and again you will need to change "Once" To "Forever" or you can also set how many times you want it to run by clicking on "Other" but in this example i'll show you by clicking "Forever".
Step 9 : OK, we are done with our animation now we need to save it..!, Go to File -> Save for Web or press Alt+shift+ctrl+s. After opening the Save for Web Dialog you will get some default setting don't change it. see the image below and see is the default setting are the same as mine.
Click on Save button, Now you will be 2 files 1 is our Animated Image and 2 is The HTML Document / File. Right click on HTML document and click edit HTML, Just copy the codes and paste it. Now you are done ..!
Hope you like this tutorial.
-Thanks


 After clicking on "Once" button you will see a drop down menu will appear, when you load a Animation frame timeline by default the frame speed / time is selected to 5 sec in the same way it's also selected to "ONCE" so if you want to make it to run again and again you will need to change "Once" To "Forever" or you can also set how many times you want it to run by clicking on "Other" but in this example i'll show you by clicking "Forever".
  Click on Save button, Now you will be 2 files 1 is our Animated Image and 2 is The HTML Document / File. Right click on HTML document and click edit HTML, Just copy the codes and paste it. Now you are done ..!


No comments:
Post a Comment
Your Comment Will Be Visible After Approval, Thanks !